How To Unscrew A Hose
If you have ever had a hose that has become stuck or too tight to unscrew, you know how frustrating it can be. Fortunately, with the right tools and know-how, it is possible to unscrew a hose without damaging it. This guide will teach you the best way to unscrew a hose, so you can get back to your project in no time.
Identifying the Type of Hose
Unscrewing a hose can be a tricky process, especially if you don’t know what type of hose you have. Identifying the type of hose is the first step in unscrewing it; different types of hoses require different tools and techniques. Knowing the type of hose you have will help you determine the best approach for unscrewing it.
Common types of hoses include plastic, rubber, metal, and braided. Of these, plastic hoses are the most common and easiest to unscrew. They often have plastic nut-and-bolt style fittings that can be removed with a wrench, pliers, or a screwdriver. Rubber hoses are more difficult to unscrew and require a specialized tool like a hose clamp wrench. Metal hoses are very durable but must be unscrewed with a pair of adjustable pliers or a wrench. Braided hoses are usually made of stainless steel and require a pair of channel-type pliers to unscrew.
Identifying the type of hose you have will make the unscrewing process much easier. If you’re not sure what type of hose you have, it’s best to consult a professional. They’ll be able to determine the type of hose and explain the best way to proceed with unscrewing it.
Assembling the Necessary Tools
If you’re planning on unscrewing a hose, the first step is to ensure you have the right tools for the job. Depending on the model, you may need a wrench, pliers, or even a screwdriver. It’s important to have the right tools to make the job easier and to do it safely.
When you have the necessary tools, you need to locate the hose connection. If you’re unscrewing a hose from a faucet, you will need to find the connection point. This is typically located at the bottom of the faucet, near the main water line.
Once you have located the connection point, you need to make sure the hose is secure. This can be done by using a wrench or pliers to tighten the connection. Once the hose is secure, you can then start to unscrew it.
To unscrew the hose, you will need to turn the connection in a counterclockwise motion. Make sure to hold the hose steady with one hand as you use the tool with the other. This will ensure that the hose does not twist or turn as you unscrew it.
Once the hose has been unscrewed, you may need to use a wrench or pliers to disconnect it from the faucet. You may also need to use a screwdriver to remove the hose from the connection point. After the hose is removed, you can then put in the new hose and reattach it to the faucet.
Unscrewing a hose can be an intimidating task, especially if you don’t have the right tools. However, with the right tools and following these steps, you can easily and safely unscrew a hose.
Preparing the Hose for Unscrewing
When unscrewing a hose, it’s important to first make sure the hose is properly prepared. This means ensuring that the hose is free of dirt and debris, and that the fittings are not too tight. Start by making sure the hose is free from any dirt or debris that could interfere with the unscrewing process. If there is any dirt or debris present, use a cloth to wipe it away. If the fittings are too tight, use a wrench to loosen them before unscrewing. Once the hose is prepared, you can begin the unscrewing process.
Unscrewing the Hose
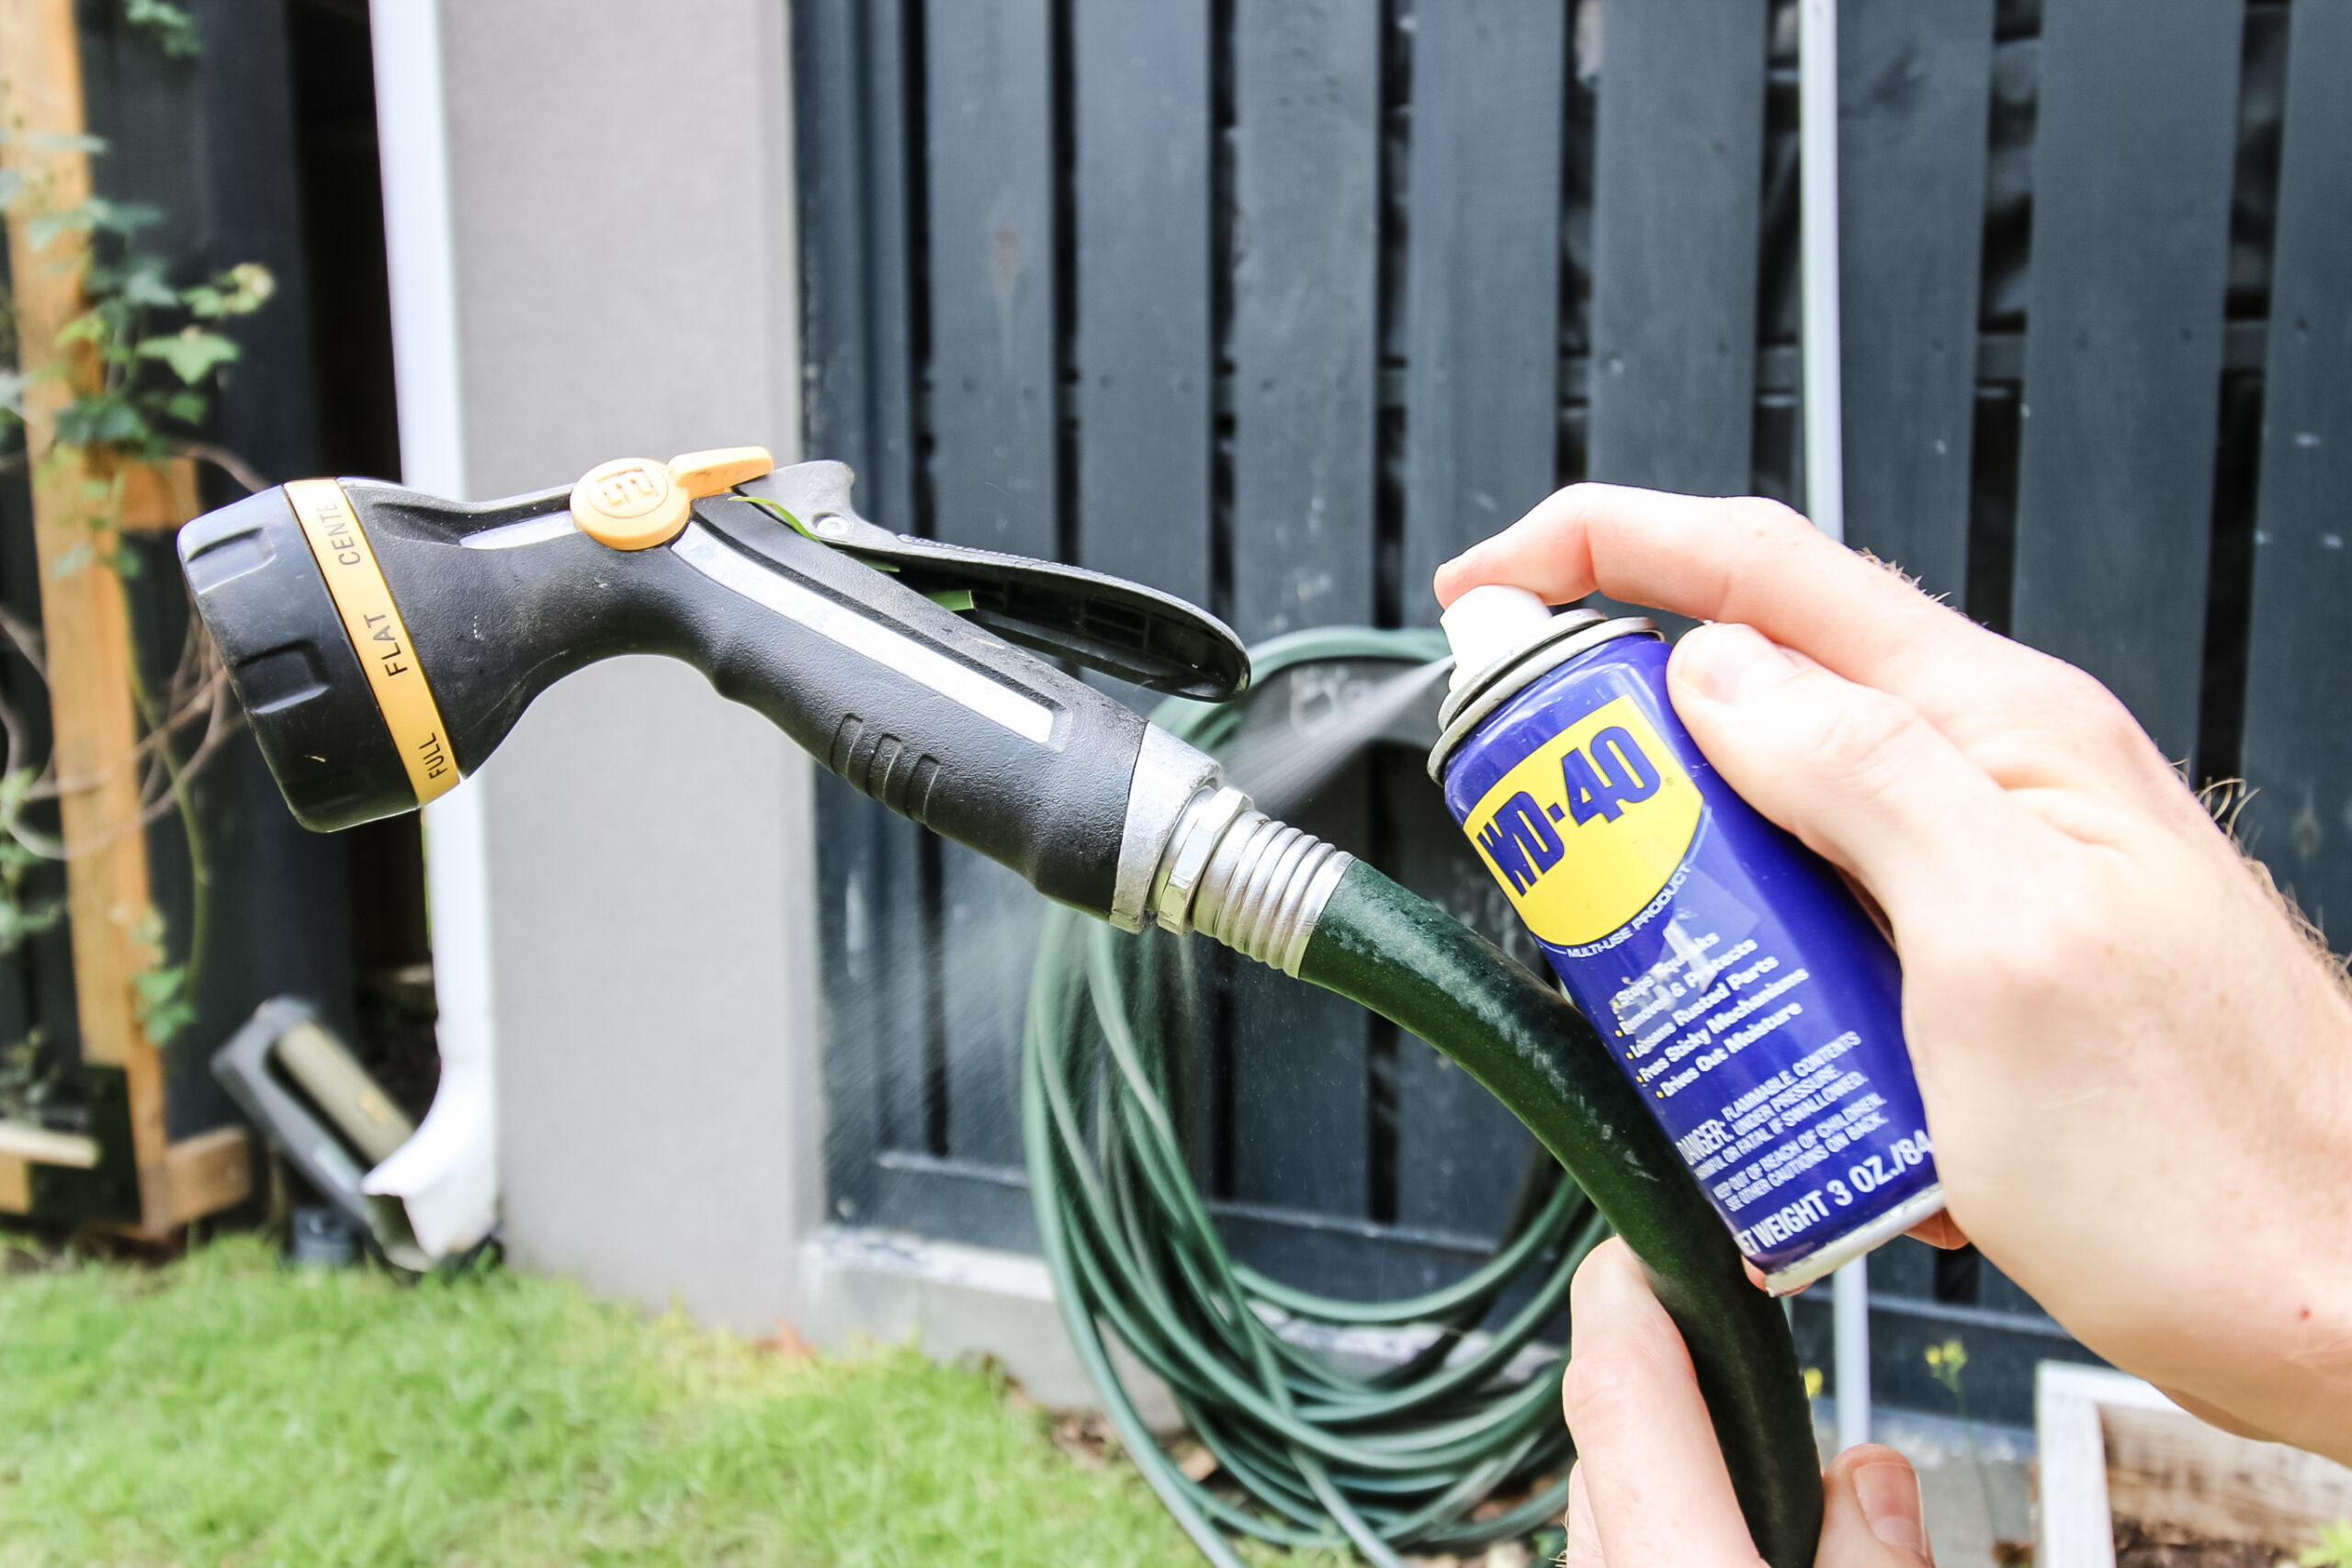
Unscrewing a hose is a simple task, but it can be intimidating for novice DIYers. Fortunately, all it takes is a few basic steps and the right tools to get the job done. To unscrew a hose, you’ll need a wrench or adjustable pliers. Start by loosening the hose clamp, then twist the hose counterclockwise to unscrew it. If the hose is stuck, use a lubricant like WD-40 and try again. Once the hose is loose, unscrew it completely and inspect it for any damage that might have occurred during the process. If it’s damaged, replace it. Finally, make sure to clean the threads to ensure a tight seal when you screw the hose back in. With these easy steps, you can safely and quickly unscrew a hose.
Removing the Hose
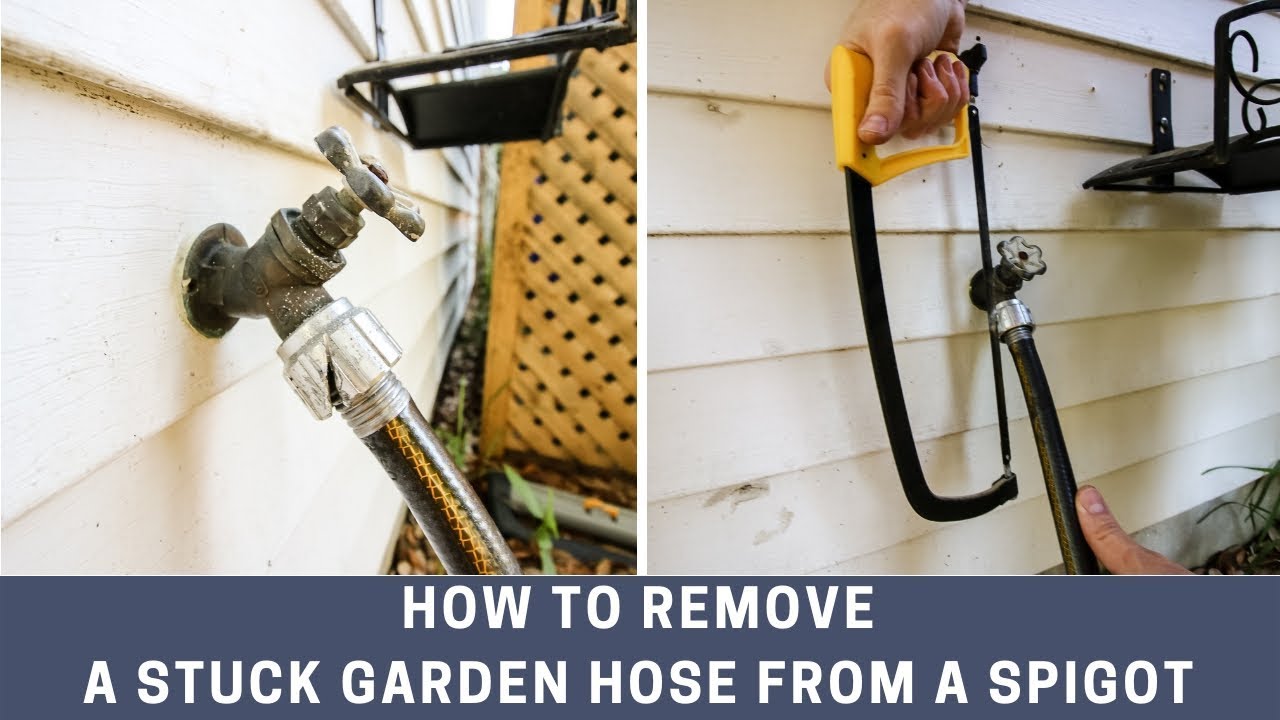
Removing a hose can be a difficult task, especially if it is stuck due to worn out threads, corrosion, or other damage. Fortunately, there are a few tips and tricks to help unscrew a hose that has become stuck. The first step is to inspect the hose to identify the problem. If the threads are damaged or worn out, it may be impossible to unscrew the hose without causing further damage. In these cases, replacement may be the best option.
If the threads are in good condition, the next step is to apply some penetrating oil to the threads of the hose. This will help to break up any rust or corrosion that may be present, making it easier to unscrew the hose. Then, use some manual force to turn the hose in the opposite direction of the original screwing direction. Use an adjustable wrench or pliers to get a good grip on the hose and apply consistent pressure while turning. Applying heat to the connection can also help loosen the threads.
Finally, if the hose is still stuck, it may be necessary to use a tool known as a hose puller. This tool is designed to remove stuck hoses without damaging the threads. Make sure to carefully follow the instructions when using a hose puller. With these tips, you should be able to unscrew and remove a hose with minimal effort.
Cleaning Up After Unscrewing
A Hose
A hose is a versatile tool that can be used in many different ways, but it can also be a source of frustration if it gets stuck or is difficult to unscrew. Unscrewing a hose can be tricky, especially if you’re not sure how to do it. Luckily, there are a few tips and tricks that can help make the process easier. After unscrewing the hose, it’s important to remember to clean up any mess that may have been made during the process.
The first step in cleaning up after unscrewing a hose is to use a damp cloth or sponge to wipe away any debris or dirt that may have been created. It’s also important to check the area around the hose for any leaks that may have occurred. If you do find a leak, it’s important to stop it immediately. You may need to use a patch or some type of sealant to prevent any more problems.
Once you have cleaned up the area around the hose, it’s important to check the condition of the hose itself. Look for any tears, cracks, or other signs of damage. If the hose is still in good condition, you can reattach it. If not, then it’s important to replace the hose with a new one.
Finally, after the hose is reattached or replaced, it’s important to test the connection for any leaks. This will help ensure that the hose is functioning properly and that there are no problems with the connection. Following these simple steps will help ensure that your hose is functioning properly and that it’s ready for use.
Troubleshooting Tips
When it comes to unscrewing a hose, it can be a tricky task. It can be hard to know where to start, especially if you’ve never done it before. Fortunately, there are a few tips and tricks you can use to make the process easier and more successful. Firstly, make sure you have the right tools for the job and the right size wrench for the hose. Secondly, if the hose is tightly screwed, use lubricant such as WD-40 to help loosen it. Thirdly, use a pair of pliers to grip the hose and unscrew it. Fourthly, if the nut is stuck, use a hammer and a block of wood to tap it loose. Finally, once the hose is unscrewed, wrap it in a cloth to protect it from dirt and dust. Following these tips will help make unscrewing a hose much easier.
Summary and Recap
A hose can be a tricky tool to unscrew, but with the right knowledge and tools, it can be done quickly and easily. To unscrew a hose, first, make sure that the valve is off and that the hose is not pressurized. Next, use a pair of adjustable wrenches to twist the hose until it comes loose. If that doesn’t work, apply heat to the joint and use the wrenches again. If all else fails, use a hacksaw to cut through the hose.
In summary, it is important to remember the following steps when attempting to unscrew a hose: make sure that the valve is off and that the hose is not pressurized, use a pair of adjustable wrenches to twist the hose until it comes loose, and if necessary, apply heat to the joint and use the wrenches again, or use a hacksaw to cut through the hose. With the proper knowledge and tools, unscrewing a hose can be done in no time.
FAQs About the How To Unscrew A Hose
1. What tools do I need to unscrew a hose?
Answer: Depending on the type of hose, you may need a pair of pliers, adjustable wrench, socket wrench, or a screwdriver.
2. Is it difficult to unscrew a hose?
Answer: Unscrewing a hose can be relatively simple or more difficult depending on the type of connection and how tight it is.
3. What should I do if I can’t unscrew the hose?
Answer: If you are unable to unscrew the hose by hand, you may need to use a lubricant such as WD-40 or other type of penetrating oil to help loosen it.
Conclusion
In conclusion, unscrewing a hose is a simple process that can be done in a few easy steps. It is important to remember to always wear protective gloves and safety goggles when performing the task. If the hose is stuck or corroded, it may be necessary to use a lubricant or a wrench to loosen it. Finally, if the threads are stripped, it is best to replace the hose altogether. With these guidelines, you should be able to unscrew any hose you come across.