How To Fix A Leaky Faucet (Cartridge Or Compression)
It is very annoying and time-consuming to deal with a leaky faucet. Fortunately, there are two common types of faucet, cartridge and compression, and the steps to fix them are fairly straightforward. With the right tools and some patience, you can fix your faucet in no time. For a cartridge faucet, start by turning off the water supply and removing the handle. Then, take out the retaining clip and pull out the cartridge. Replace the old cartridge with a new one and reassemble the handle. If the faucet is a compression type, start by shutting off the water supply, removing the handle, and unscrewing the packing nut. Replace the old washer with a new one, and reassemble the faucet. Both types of faucet can be easily fixed with just a few steps.
Understanding Cartridge and Compression Faucets
Most homeowners are familiar with the difficulties of dealing with a leaky faucet. Whether it’s a dripping tap or a leak that’s more serious, it can be a real hassle to repair. Before you can begin repairs, however, you must understand the type of faucet you have. Faucets usually come in two varieties: cartridge and compression. Knowing the difference between the two is essential for making sure your repair goes smoothly.
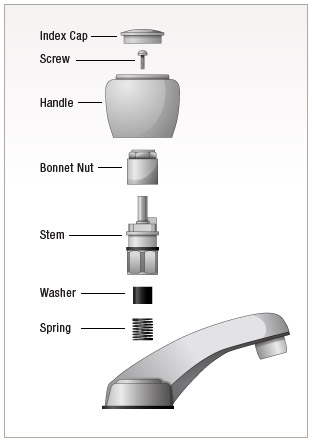
Cartridge faucets are relatively new compared to compression faucets. They are designed with a cartridge inside the valve body that controls the flow of water. The cartridge consists of a series of metal disks that open and close to control the flow of water. Cartridge faucets are relatively easy to repair and maintain. All you need to do is remove the cartridge, replace it, and reassemble the faucet.
Compression faucets, on the other hand, have been around for decades. They work by compressing a rubber washer against the valve seat to control the flow of water. Compression faucets can be trickier to repair than cartridge faucets. When a leak occurs, you must replace the washer and make sure the faucet is properly tightened.
Both cartridge and compression faucets have their pros and cons. Cartridge faucets are easier to maintain, but they can be more expensive than compression faucets. Compression faucets, on the other hand, are less expensive but can be more difficult to repair. Understanding the differences between the two is essential to making sure your repair goes smoothly.
Locating and Identifying the Leak
If you’re dealing with a leaky faucet, the first step is to locate and identify the source of the leak. Identifying the type of faucet that you have is the key to success. Is it a cartridge or a compression type? Cartridge faucets are the most common and are typically found in newer homes. Compression type faucets are typically found in older homes, and feature two handles.
Once you have identified the type of faucet you have, you can start to diagnose the leak. With a cartridge faucet, you will need to check the cartridge to see if it is cracked or warped. With a compression-style faucet, you will need to check the O-rings and the seals to ensure that they are not damaged or worn. In both cases, it is important to remove any debris or build-up that could be preventing the faucet from working properly.
Once you have identified the source of the leak, you can move on to the repair process. Depending on the type of faucet and the severity of the leak, you may need to replace the entire cartridge or the O-rings and seals. It is important to make sure that you use the correct parts and follow the manufacturer’s instructions when making repairs.
Preparing to Fix a Leaky Cartridge Faucet
It’s important to be fully prepared before attempting to fix a leaky cartridge faucet. First, you’ll want to shut off the water supply to the sink and make sure the faucet is in the off position. Remove the handle of the faucet and locate the cartridge. Make sure to take a picture of the setup so you can remember how to put it back together. Then, using a pair of pliers, remove the retaining clip that holds the cartridge in place and pull the cartridge out.
Once the cartridge is removed, you can inspect it to determine the cause of the leak. It’s also a good idea to inspect the rubber seals and other parts of the faucet, such as the O-rings, for additional damage. If the cartridge is damaged, you may need to purchase a new one. If the other components are damaged, you’ll need to replace those as well.
Once you have the parts necessary to repair the faucet, you can reassemble the faucet and turn on the water supply. Then, test the faucet to make sure it is no longer leaking. If the faucet is still leaking, you may need to make further adjustments or replace more parts. Knowing how to properly prepare for and fix a leaky cartridge faucet can save you from headaches and wasted money in the long run.
Removing and Replacing the Cartridge
When it comes to fixing a leaky faucet, one of the most common solutions is to remove and replace the cartridge. A cartridge is essentially the inner-workings of the faucet, and it is responsible for controlling the flow of water and regulating the temperature. To fix a leaky faucet with a cartridge, you must first identify the type of cartridge you have. There are two main types of cartridges: compression and cartridge-style.
Compression cartridges are the most common and can be found in many older faucets. To remove and replace a compression cartridge, you must first turn off the water supply and remove the handle. Then, unscrew the nut from the top of the cartridge and lift the cartridge out of the faucet. To install a new cartridge, insert it into the faucet and make sure it is firmly in place. Then, replace the nut and the handle.
Cartridge-style cartridges are more common in newer faucets. To remove and replace a cartridge-style cartridge, you must first turn off the water supply and remove the handle. Then, remove the retaining clip by unscrewing it. Lift the cartridge out of the faucet, and insert the new cartridge into the faucet. Make sure it is firmly in place and then replace the retaining clip and the handle.
Fixing a leaky faucet with a cartridge can be an easy job, but it is important to make sure you have the right type of cartridge and that it is properly installed. If you need help identifying the type of cartridge you have or are unsure of how to remove and replace it, it is best to contact a professional plumber for assistance.
Preparing to Fix a Leaky Compression Faucet
Fixing a leaky faucet doesn’t have to be a daunting task. Whether you have a cartridge or compression faucet, preparing to fix your leaky faucet is a relatively easy process. Preparing to fix a compression faucet requires gathering the right tools and supplies. You’ll need a basin wrench, flat-head screwdriver, adjustable wrench, and replacement washers, gaskets, and O-rings. Additionally, have a few rags and a bucket handy to help contain the water from the leak.
Once you have all the supplies on hand, the next step is to turn off the water supply to the faucet. This is typically done at the shutoff valve located beneath the sink. After the water supply is shut off, turn on the faucet and allow the water to drain.
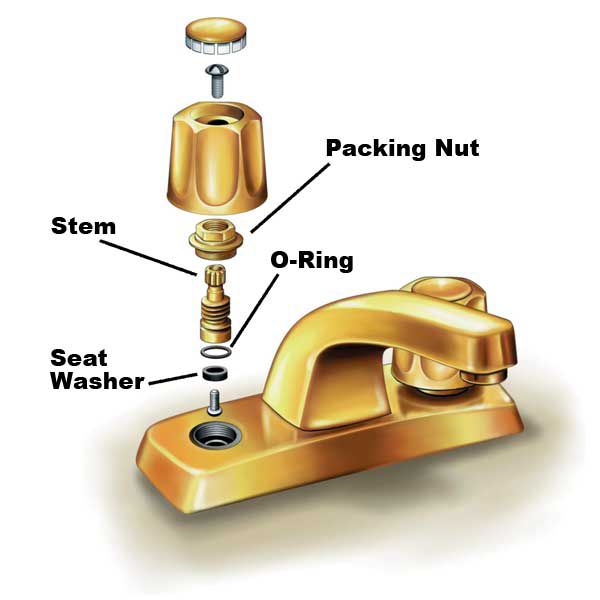
Once all the water has drained, remove the decorative cap and the handle from the faucet. This will expose the faucet’s stem, which is connected to the valve seat. Use the basin wrench to unscrew the stem from the valve seat. Once the stem is loose, pull it out of the faucet and use a flat-head screwdriver to remove the packing nut. This will expose the O-ring and washer, which can be replaced with new parts.
Reassemble the faucet and turn on the water supply. Test the faucet to ensure the leak has been resolved. If the leak persists, the valve seat may need to be replaced. With the right supplies and knowledge, you can fix a leaky compression faucet with ease.
Replacing O-Rings and Seals
Leaky faucets can be quite annoying, but thankfully, they are usually relatively easy to fix. Depending on the type of faucet, you may need to replace O-rings and seals. O-rings are circular seals that are designed to form a watertight seal between the valve body and the handle stem. Compression faucets also require a washer and a stem screw to be replaced. Replacing these parts is not difficult, but it does require some basic know-how. First, you’ll need to turn off the water supply and remove the handle. You’ll then need to unscrew the valve stem and remove the O-ring or washer. Make sure to take a picture of the parts before you remove them so that you know how they should look when you go to replace them. Once the O-ring or washer is removed, you can replace it with a new one. Be sure to place the O-ring on the valve stem properly and press it firmly so that it stays in place. You’ll also need to make sure the washer is the correct size and shape for your faucet. Once the O-ring and washer are replaced, you can reassemble the faucet and turn the water supply back on. With a few simple steps, you will have fixed your leaky faucet.
Reinstalling and Testing the Faucet
Once you have reassembled the faucet, the next step is to reinstall it and test it. Start by re-installing the faucet into the sink. Make sure to use the appropriate sealant, such as plumbers’ putty or silicone caulk, to ensure a leak-proof seal. Turn the water supply back on and turn the handles to the on position. Check for any leaks around the base of the faucet. If you find any, use the appropriate sealant to fix the leak.
Once you’ve ensured that the faucet is properly sealed, it’s time to test it. Turn the handles of the faucet to the off position and then turn them to the on position. Check the water pressure and make sure it is adequate. Make sure the handles turn smoothly and that they do not become stuck in any position. Listen for any dripping sounds and check for any leaks. If everything appears to be working properly, give the faucet a final test. Fill a sink with water and then turn the faucet off. If there are no leaks, then you have successfully fixed the leaky faucet.
Troubleshooting and Maintenance Tips
Troubleshooting and maintenance tips are essential for keeping your faucets running smoothly and efficiently. There are two main types of faucets, cartridge and compression, and each requires different steps to identify and fix issues. In this article, we’ll discuss the common problems associated with cartridge and compression faucets, and provide tips on how to diagnose and fix them. We’ll also provide information on preventive maintenance, which can help you avoid costly repairs and extend the life of your faucets. With the right tools and knowledge, you can successfully troubleshoot and maintain your cartridge or compression faucet.
FAQs About the How To Fix A Leaky Faucet (Cartridge Or Compression)
1. How do I know if my faucet has a cartridge or compression system?
Answer: The easiest way to tell whether your faucet has a cartridge or compression system is to remove the handle and look inside. If you see a cylinder with a stem coming out of it, it is a cartridge. If you see a nut and washer, it is a compression system.
2. What tools do I need to fix a leaky faucet?
Answer: To fix a leaky faucet, you will need a few basic tools such as a screwdriver, pliers, an adjustable wrench, and some replacement parts such as a new cartridge or washer.
3. How long does it take to fix a leaky faucet?
Answer: Fixing a leaky faucet can take anywhere from 15 minutes to 1 hour, depending on the complexity of the job. If you are unsure of what to do or need help, it is best to call a professional plumber.
Conclusion
Fixing a leaky faucet can be an easy task if you know what type of faucet you have. Depending on the type of faucet, the repair steps may vary from replacing the cartridge or washer to tightening the nut. With the right tools and a bit of patience, you can easily repair your leaky faucet and keep it running smoothly.