How Do You Install A Delta Single Handle Kitchen Sink Faucet?
Installing a Delta single handle kitchen sink faucet is a fairly easy job that most homeowners can do with a little bit of guidance. Delta provides clear instructions and helpful diagrams to make the job easier. This article will explain the basic steps for installation, from preparing the sink to securing the faucet in place. You will need a few basic tools, including adjustable wrenches, pliers, and a putty knife. With a bit of patience and the right tools, you will be able to install your Delta single handle kitchen sink faucet quickly and easily.
Overview of Delta Single Handle Kitchen Sink Faucet
Installing a Delta single handle kitchen sink faucet can be an intimidating task, but it doesn’t have to be. With the right tools and a bit of know-how, you can have your new faucet up and running in no time. Delta’s single handle kitchen sink faucet offers the convenience of having one handle that controls both the flow and temperature of water. It also features a ceramic disk valve which adds durability and prevents wear and tear. Delta Single Handle Kitchen Sink Faucets come in a variety of finishes and styles, offering you the perfect way to customize your kitchen. With easy-to-follow instructions, you’ll be able to install your new Delta faucet in no time. Read on to learn how to install your Delta Single Handle Kitchen Sink Faucet.
Preparing to Install the Faucet
Installing a Delta single handle kitchen sink faucet can be a daunting task for the average homeowner. But with a few simple steps, you can easily install a new Delta faucet with ease. Before you begin, there are a few essential steps to take to ensure a successful installation. First, you must be sure that the faucet you have chosen is compatible with the type of sink you have. You will also need to turn off the water supply to the kitchen sink to avoid any accidents during the installation process. Additionally, it is important to have the right tools on hand such as an adjustable wrench, an adjustable pliers, a screwdriver, and a basin wrench. With the right tools and preparation, you will be ready to install your Delta faucet in no time.
Step-By-Step Guide to Installing the Faucet
Installing a Delta single handle kitchen sink faucet can be a daunting task, but with the right tools and a bit of patience, anyone can complete the task. This step-by-step guide will provide you with the essential information and instructions to make sure that your Delta single handle kitchen sink faucet is installed correctly and securely.
First, you will need to gather the right tools for the job. A basin wrench, plumber’s putty, adjustable wrench, PVC primer and cement, and a slotted screwdriver are all necessary. Additionally, it is always a good idea to have a few extra washers on hand, just in case.
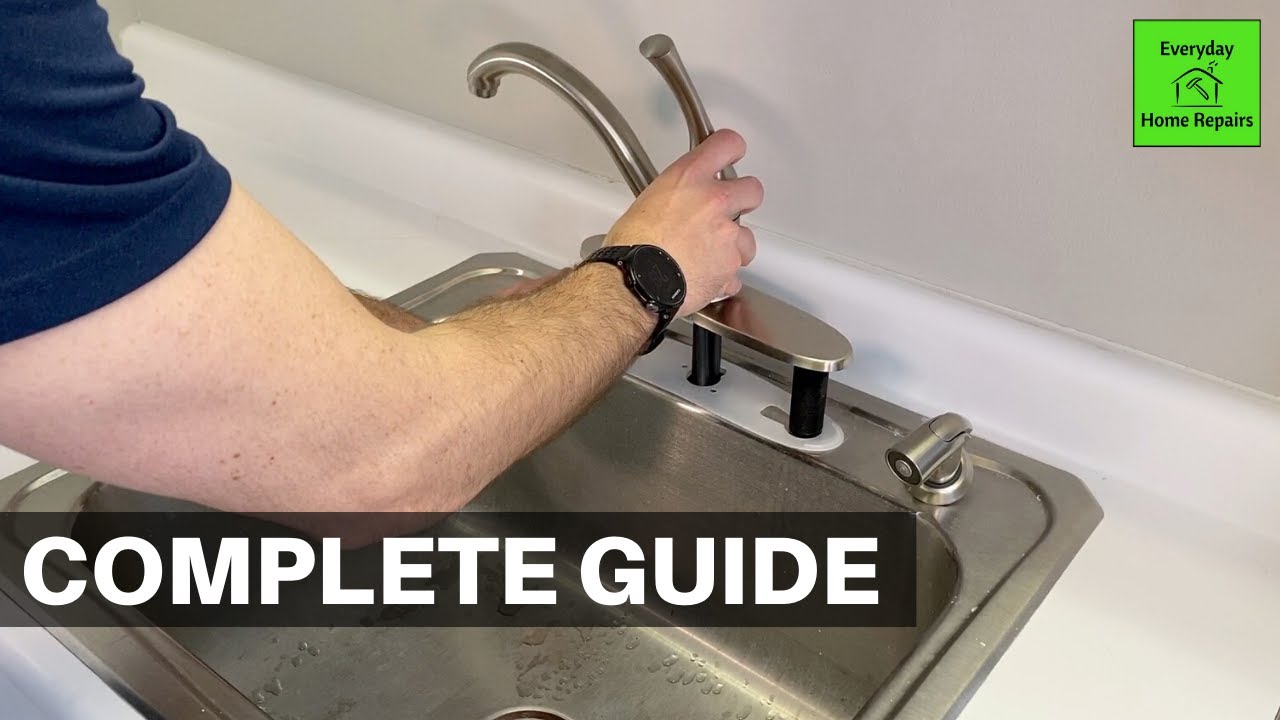
Once you have all the materials, you can begin the installation. Start by turning off the water supply and disconnecting the water lines from the existing faucet. Next, use the basin wrench to loosen and remove the mounting nuts underneath the sink. Now, you can remove the old faucet and replace it with the new Delta single handle kitchen sink faucet.
Using the plumber’s putty, apply a generous amount to the underside of the faucet and attach it to the sink. Tighten the mounting nuts using the adjustable wrench, and reconnect the water supply lines with the PVC primer and cement. Finally, use the slotted screwdriver to tighten the handle and turn the faucet on to check for leaks.
Connecting the Water Supply Lines
Installing a Delta single handle kitchen sink faucet is a simple but important task for any homeowner to do. Connecting the water supply lines is the final step in the installation process. Once you have attached the faucet to the sink, you will need to connect the hot and cold supply lines to the faucet.
First, ensure that both the hot and cold water supply lines are connected to the valves under the sink. Then, attach the appropriate supply lines to the hose connections on the faucet. Make sure that the right supply line is connected to the right side of the faucet. Finally, secure the supply lines to the faucet by tightening the connection screws with a wrench.
When you’ve finished connecting the water supply lines, turn on the valves and check for possible leaks. If everything is secure and leak-free, you can then proceed to turn on the faucet and test the water pressure. With a few simple steps, you can install a Delta single handle kitchen sink faucet and enjoy new and improved kitchen convenience.

Testing the Faucet for Leaks
Once you have successfully installed the Delta single handle kitchen sink faucet, it is important to test it for any potential leaks. To test the faucet, turn the water supply on and then turn the handle of the faucet to the full on position. Check the connections and the faucet for any signs of leaking. If there are any signs of leaking, tighten the connections to ensure that the seal is secure. After the connections are secure, turn the water supply back off.
To further test for leaks, turn the handle of the faucet to the full on position and then turn the water supply on. If the water pressure is low, you may need to adjust the valve on the water supply line. If the water pressure is still low, check the faucet and connections for any signs of leaking. Once all the connections have been checked and tightened, the faucet should be ready to use.
Installing a Delta single handle kitchen sink faucet is a relatively straightforward process. However, it is important to thoroughly test the faucet for any signs of leaks before using it. By checking the connections and ensuring that the water pressure is adequate, you can ensure that your faucet will operate effectively and not cause any unwanted water damage.
Sealing and Finishing the Faucet Installation
Installing a Delta single handle kitchen sink faucet can be a daunting task for a novice do-it-yourselfer. But with the right tools, materials and a little patience, you can easily complete the installation process from start to finish. The final step in the installation process is sealing and finishing the faucet. It’s important to take the time to do this step correctly, as it will ensure that there are no leaks and that the faucet will be properly sealed.
First, you’ll need to make sure that the faucet is securely attached to the sink. If it is not, use the provided screws to secure it. Once the faucet is in place, it’s time to seal it. You’ll need to use a plumber’s putty or silicone caulk to seal the edges around the base of the faucet. Make sure to apply the sealant evenly, covering the entire base of the faucet. After the sealant has been applied, use a damp cloth to smooth the edges and remove any excess sealant.
Troubleshooting Common Installation Issues
Installing a Delta single handle kitchen sink faucet can be a daunting task for any DIYer. To help make the process easier, it’s important to troubleshoot any issues that you may encounter. There are a few common issues that can arise during installation, such as incorrect measurements, incorrect piping, and incorrect installation of the faucet itself. Knowing how to identify and fix these issues will ensure that your faucet is installed correctly and that you can enjoy it for years to come.
When it comes to incorrect measurements, the most common issue is that the faucet is too big or too small for the sink. Before starting the installation, take accurate measurements of the existing sink and use those to determine the size of the faucet you need. Additionally, make sure to double-check the measurements when installing the faucet, as a single wrong measurement can lead to problems.
Incorrect piping can be another issue during installation. This is especially true if you’re installing the faucet yourself and don’t have a professional plumber helping out. Make sure that the piping is of the correct size, as a smaller or larger pipe can lead to issues with the faucet.
Frequently Asked Questions About Installing Delta Single Handle Kitchen Sink Faucets
Installing a Delta single handle kitchen sink faucet can be a daunting task, especially if you’ve never done it before. However, with the right tools and knowledge, you can successfully install your new faucet and make sure it’s working properly. To help you out, we’ve put together some of the most frequently asked questions about installing Delta single handle kitchen sink faucets.
First, what tools are needed for the installation? Generally, you’ll need a basin wrench, a pair of adjustable pliers, a screwdriver, and a wrench. In some cases, you may also need a few specialty tools, such as a pipe wrench or a hacksaw. Additionally, you’ll need Teflon tape and a few other supplies, such as a supply line and mounting screws.
Next, what’s the best way to ensure a successful installation? Before you begin, make sure you have all the necessary tools, supplies, and instructions. Additionally, it’s important to read the instructions carefully and follow the steps in the exact order listed. This will help you avoid making a mistake and having to start over.
FAQs About the How Do You Install A Delta Single Handle Kitchen Sink Faucet?
Q1. What tools are needed to install a Delta single handle kitchen sink faucet?
A1. You will need a few basic tools to complete the installation, including an adjustable wrench, a basin wrench, and a Phillips screwdriver. You may also need Teflon tape, plumber’s putty, and a bucket.
Q2. How do I turn off the water supply to the faucet?
A2. Shut off the main water supply to the entire house, or turn the shut-off valves under the sink. It is important to do this before beginning the installation process.
Q3. What is the first step in installing the faucet?
A3. The first step is to remove the old faucet. Use the basin wrench to loosen the mounting nuts, then remove the faucet from the sink. Be sure to take note of the position of the water supply lines and any other components you may need to reinstall.
Conclusion
Installing a Delta single handle kitchen sink faucet is not a difficult task. With the right tools and instructions, you can easily upgrade your sink in just a few steps. To install a Delta single handle kitchen sink faucet, you will need to gather the necessary supplies and components, mount the faucet to the sink, connect the water supply lines, and turn on the water supply. Once the installation is complete, you can enjoy the convenience of having a single-handle kitchen sink faucet.