How Do You Install A 3 Hole Kitchen Faucet?
Installing a 3-hole kitchen faucet is a relatively simple process that can be completed in a few easy steps. Before beginning, it is important to make sure that you have all of the necessary tools and materials to complete the job. This includes the faucet, a faucet mounting plate, the supply lines, and any other parts that may be required for the specific faucet. Once you have everything you need, the installation process can begin. First, you will need to turn off the water supply to the sink. Next, you will remove the existing faucet and prepare the sink for the installation of the new faucet. This may include removing the sink strainer and any other parts that may be blocking access to the mounting holes. Once the sink is prepared, the mounting plate can be attached to the sink and the faucet can be secured in place. After the faucet is securely mounted, the supply lines can be connected and the water can be turned back on. Finally, any necessary adjustments can be made to ensure the faucet is operating correctly. With a few simple steps, your 3-hole kitchen faucet can be installed and ready for use.
Tools and Materials Required
Installing a 3-hole kitchen faucet is a relatively simple task, but it requires the right tools and materials to ensure a successful outcome. Before beginning, make sure you have the necessary tools and materials to complete the job. You’ll need a basin wrench, plumber’s putty, a cloth, and a drill and bits. Additionally, you’ll need two supply lines, a faucet, and a shutoff valve. Ensure you have all the necessary parts before you begin, as this will save time and frustration. Once you have all the necessary equipment, you’re ready to start installing your 3-hole faucet.
Preparation
, installation, and maintenance of a 3-hole kitchen faucet can be intimidating and time-consuming. After all, the kitchen is one of the most important and used rooms of the house. However, the process does not have to be difficult. With the right tools and some know-how, you can easily install a 3-hole kitchen faucet yourself.
Installing a 3-hole kitchen faucet may seem daunting, but it is actually quite straightforward if you follow the right steps. Before you begin, make sure you have all the necessary tools and supplies. You will need a basin wrench, an adjustable wrench, plumber’s tape, a Phillips screwdriver, and of course, the faucet. Once you have everything together, you can begin the installation process. Start by turning off the water supply. Then, remove the existing faucet, and install the new one in its place. Make sure to use plumber’s tape to ensure a tight seal. Finally, turn the water back on and test the faucet to make sure it is working correctly.
Proper maintenance of a 3-hole kitchen faucet is essential to ensure it works correctly and lasts for a long time. Regularly clean the faucet with a mild soap and warm water. Additionally, you should inspect the faucet for any signs of damage or leaks. If you notice any issues, contact a plumber for help.
Installing and maintaining a 3-hole kitchen faucet is not as complicated as you might think. With the right tools and supplies and some know-how, you can easily install and maintain a 3-hole kitchen faucet yourself. Doing so will help you save time and money, and ensure your kitchen looks its best.
Detaching Old Faucet
Installing a 3 hole kitchen faucet may seem intimidating at first, but it’s actually a fairly simple process. The first step is to detach the old faucet. This can typically be done with a wrench, although you may need a basin wrench if you have a tight fit. Make sure to turn off the water supply before you start. Disconnect the water lines from the hot and cold valves, then unscrew the mounting nuts that hold the faucet in place. Once the old faucet is removed, you’re ready to install the new one.
Installing New Faucet
in the Kitchen
Installing a new faucet in the kitchen is a great way to update the look and feel of your space. This project requires some basic plumbing skills, but is relatively easy to do and can be accomplished in a few hours. To install a 3 hole kitchen faucet, you’ll need the correct supplies, including the faucet, mounting brackets, and the necessary mounting hardware. You’ll also need to ensure that your sink is compatible with the faucet you’ve purchased. With the right supplies in hand, you’ll be able to complete the project in a few simple steps.
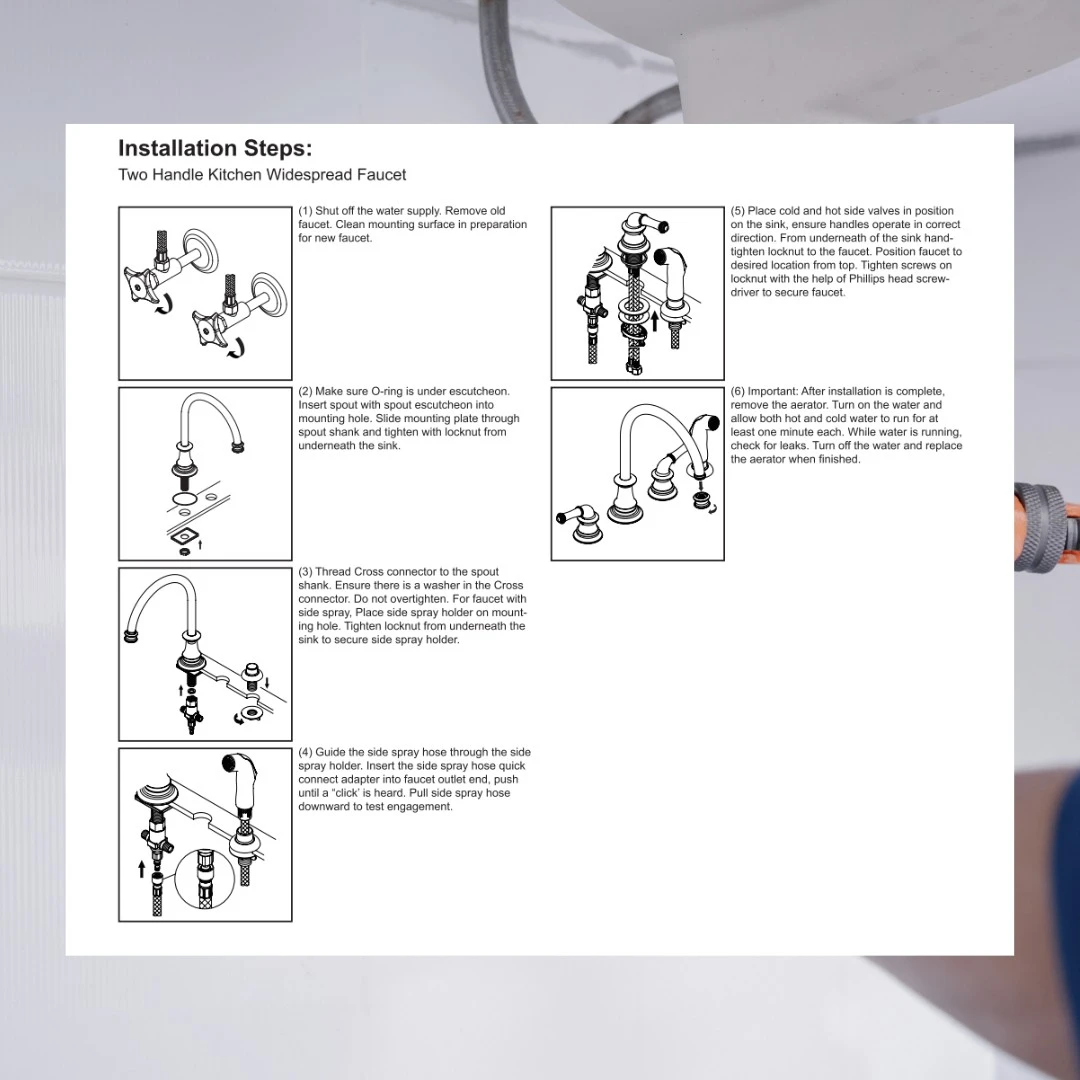
The first step is to turn off the water supply to your sink. Then, you’ll need to remove the existing faucet and any related hardware. Once the old faucet has been removed, you’ll need to install the new mounting brackets and secure them to the sink. After that, you’ll be ready to install the new faucet. Place the faucet into the sink and secure it with the included mounting hardware. Then, connect the water supply lines to the faucet.
Once the new faucet is in place, you’ll need to test it to make sure it’s working properly. Open the valves to the water supply and check for any leaks. If there are no leaks, you can turn on the water and test the faucet. If everything works as expected, you’ve successfully installed a 3 hole kitchen faucet!
Connecting Water Lines
Installing a three-hole kitchen faucet can seem like a daunting task, but with the right tools and a little bit of patience, anyone can do it. The first step in the process is to connect the water lines. This involves attaching the supply lines to the hot and cold inlets of the faucet. It is important to be sure to use the correct size of washers and nuts when attaching the supply lines. Additionally, any connections should be snugly tightened to ensure a secure fit and avoid leaks. Plumbing tape should also be used as a precaution to help prevent leaks. Once the water lines are attached, the faucet can be connected to the sink.
Finishing Touches
to a Kitchen Remodel
Remodeling a kitchen is a daunting task, but when it’s done, you can be proud of your accomplishment. Installing a three-hole kitchen faucet is the finishing touch to the project. It’s not a difficult task, but it does require some knowledge of plumbing and the right tools. In this blog, we’ll discuss the steps to install a three-hole kitchen faucet, as well as what tools you’ll need to get the job done. We’ll also look at what to do in case of any issues that may arise. With the right preparation, you can finish off your kitchen remodel with a beautiful new faucet that perfectly matches your décor.
Troubleshooting
a 3 hole kitchen faucet might sound intimidating, but it doesn’t have to be. Installing a 3 hole kitchen faucet is a simple process that anyone can do with the right tools and knowledge. By following the steps in this guide, you can easily install a 3 hole kitchen faucet in no time.
Whether you’re a DIY enthusiast or a professional plumber, installing a 3 hole kitchen faucet is a relatively straightforward process. Before you begin, make sure you have the right tools for the job, such as a wrench, plumber’s putty, a basin wrench, and a screwdriver. You’ll also need your new 3 hole kitchen faucet, mounting hardware, and any applicable adapters.
Once you have all the necessary tools and materials, the installation process is relatively simple. Start by disconnecting the hot and cold supply lines and unscrewing the existing faucet from the sink. Then, install the faucet’s mounting hardware and place the faucet in the sink. Cover the mounting holes with plumber’s putty and screw the faucet in place. Finally, reattach the supply lines, turn on the water, and test the faucet.
Installing a 3 hole kitchen faucet isn’t as difficult as it might seem. With the right tools and materials, you can easily complete the job in an afternoon. Plus, if you run into any trouble along the way, there are plenty of online resources and guides to help you out.
Maintenance and Care
When it comes to installing a 3 hole kitchen faucet, maintenance and care are key. A 3 hole kitchen faucet can last for many years, but only if it is properly maintained and cared for. Proper maintenance and care includes cleaning the faucet regularly to prevent build-up of dirt, grime, and other debris. It is also important to lubricate the faucet’s moving parts to ensure smooth operation and a long life. Regular inspection of the faucet is also important, as small problems can turn into bigger issues over time. If any repairs are needed, it is best to consult with a professional to ensure the job is done properly. With regular maintenance and care, a 3 hole kitchen faucet can continue to look and function properly for many years.
FAQs About the How Do You Install A 3 Hole Kitchen Faucet?
1. What tools will I need to complete the installation of a 3 hole kitchen faucet?
Answer: You will need a basin wrench, adjustable wrench, a Phillips head screwdriver and a set of pliers.
2. Is it necessary to turn off the water supply before I begin the installation?
Answer: Yes, it is always recommended to turn off the water supply before beginning any installation or repair.
3. How do I know which type of faucet is best for my kitchen?
Answer: The best type of faucet to choose will depend on the type of sink and number of holes available. If you have a 3 hole sink, then a 3 hole kitchen faucet would be the best option.
Conclusion
Installing a 3 hole kitchen faucet is a relatively easy process that requires some basic tools and a little bit of time. With the right instructions, the homeowner can easily complete the task with minimal difficulty. Be sure to follow all instructions closely and take the time to properly prepare the area where the faucet will be installed. With the right tools and knowledge, installing a 3 hole kitchen faucet can be a breeze.