How Do You Fix A Leaking Compression Faucet?
A leaking compression faucet can be a real nuisance and can be quite wasteful of water. Fortunately, there are a number of steps you can take to fix a leaking compression faucet. First, you will need to shut off the water to the faucet. Then, you will need to remove the handle and the bonnet nut to access the valve stem. Depending on the type of valve stem, you may need to replace the stem’s washer or O-ring. Alternatively, you may need to replace the entire valve stem. Once the new parts are installed, you can reassemble the faucet and turn the water back on. With a few simple steps, you can have your leaking compression faucet fixed in no time.
Identifying the Problem
A leaking compression faucet is one of the most common plumbing issues homeowners face. Unfortunately, it can be difficult to fix without the help of a professional plumber. Before attempting to repair the faucet, it’s essential to identify the source of the leak. If the issue is simply a loose packing nut, this can often be fixed with a simple tightening; however, if the packing nut is corroded or worn out, a complete replacement is necessary. Additionally, if the issue is due to a defective washer, then this also needs to be replaced. To identify the source of the leak, it’s important to first turn off the water supply, remove the handle, and check the parts for signs of corrosion or wear and tear. In some cases, the cause of the leak may be unclear, and a more in-depth examination is needed.
Tools Needed for Repair
Compression faucets are an integral part of a home and, unfortunately, can often be the source of leaks. If you’ve noticed that your faucet is leaking, it’s important to fix it as soon as possible in order to avoid water damage and costly repairs. Fortunately, fixing a leaking compression faucet is a relatively simple task that most homeowners can do themselves with the right tools.
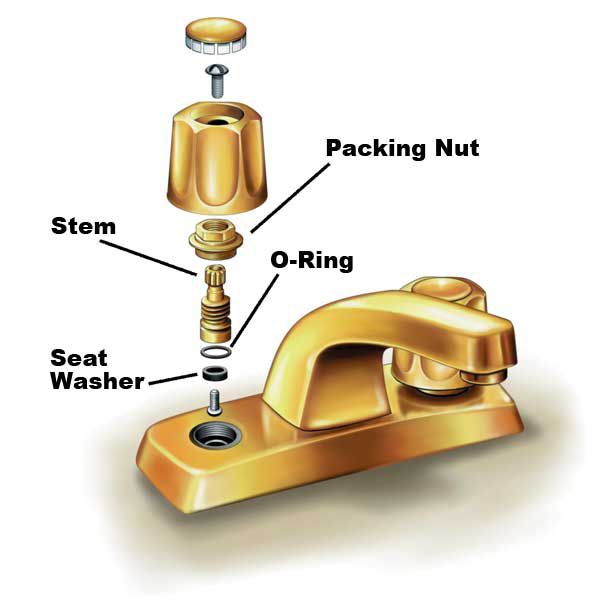
The tools you will need to repair a leaking compression faucet include a crescent wrench, adjustable pliers, a utility knife, and Teflon tape. You will also need a screwdriver, a basin wrench, and a cartridge puller. If you’re not comfortable using these tools, you can also purchase a repair kit with all the necessary items. Additionally, you may need to purchase replacement parts such as O-rings, a stem, and a seat washer.
Once you have all the necessary tools and replacement parts, you can begin the repair process. First, turn off the water supply and open the faucet to drain out any excess water. Then remove the handle and the stem, and inspect the parts for damage. If the O-rings or washer are worn, replace them. Use the Teflon tape to wrap the threaded parts and reassemble the faucet. Finally, turn the water supply back on and test the faucet for any remaining leaks.
With the right tools and replacement parts, you can repair a leaking compression faucet quickly and easily. If you’re not comfortable working on your own, contact a professional plumber to ensure that the job is done correctly.
Shutting Off the Water Supply
One of the first steps to addressing a leaking compression faucet is to shut off the water supply. This can be done by turning off the shut off valve that is usually located under the sink. It is important to ensure that the water is completely shut off before you begin any work on the faucet. If the valve isn’t accessible, you can also shut off the main water supply to the house.
Once the water has been shut off, you can begin to disassemble the faucet to diagnose the issue. Check for any loose connections, O-rings, washers, or valves. You may need to purchase a replacement part if one of these components is worn out or broken. After replacing the necessary components, you can reassemble the faucet and turn the water back on. If the faucet is still leaking, it may be time to call a plumber to inspect the issue further.
Removing the Handle and Bonnet
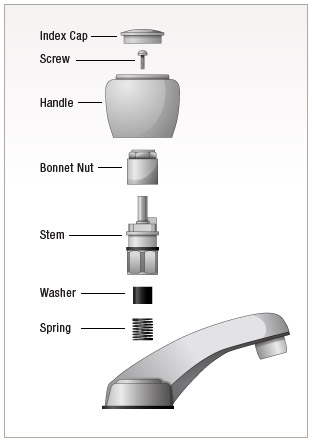
When dealing with a leaking compression faucet, the first step is to remove the handle and bonnet. To do this, you’ll need an adjustable wrench, a screwdriver, and a rag or towel. Start by turning off the water supply and placing the rag or towel over the faucet to catch any water that may be leaking. Use the adjustable wrench to loosen the handle’s set screw and remove the handle. Then, use the screwdriver to loosen the bonnet nut and remove the bonnet. Once the handle and bonnet are removed, you can access the valve stem and begin repairs.
Replacing the Washer
Compression faucets, the most commonly found fixture in the home, can be a source of frustration when they start to leak. Leaks can occur from either the hot or cold side, and the root cause is usually a worn-out washer. Replacing the washer is the most effective way to fix a leaking compression faucet.
The first step to replacing the washer is to turn off the water supply. This can be done at the shut-off valve for the faucet or at the main water supply. Once the water is off, remove the handle from the faucet. This is typically done by unscrewing the screw located on the handle or by prying off the decorative cap. Next, remove the stem and expose the washer. Carefully inspect the washer and replace it if necessary.
Once the new washer is in place, reassemble the stem and handle, making sure not to over-tighten the screws. Finally, turn the water back on and test the faucet. If done correctly, the faucet should no longer be leaking.
Replacing the washer in a compression faucet is a simple repair that can be done by most homeowners. In the event that the problem persists, it may be necessary to replace the entire faucet. However, replacing the washer is usually the first step to take when fixing a leaking compression faucet.
Reassembling the Faucet
Reassembling a leaking compression faucet is not a difficult task, but it does require some patience and attention to detail. The first step is to make sure you have the right parts and tools. Once you have the parts and tools, you can begin to reassemble the faucet. Make sure to clean the parts and use plumber’s tape or thread sealant to ensure a tight seal. Start by installing the faucet body and the bonnet nut. Then, attach the stem, the valve seat, the washer, and the packing nut. Finally, attach the handle and turn it to the off position. If the faucet still leaks, you may need to replace the stem, valve seat, or washer. It’s important to remember to use plumber’s tape or thread sealant to ensure a tight seal and prevent future leaks. With a bit of patience and attention to detail, you should be able to fix your leaking compression faucet.
Testing and Finishing Up
Fixing a leaking compression faucet is a relatively straightforward task, but it requires a few steps to ensure it is done correctly. The final step is testing and finishing up. Once the faucet is re-assembled, turn the water back on and test the faucet. Make sure that the faucet is no longer leaking and that it operates properly. If the faucet still leaks, it may be a sign that the washers are not properly seated. The washers may need to be replaced or adjusted for the faucet to operate properly without leaking. Once the faucet is no longer leaking, it is time to finish up the repair. Clean up any mess that may have been created during the repair and replace any decorative components. Finally, inspect the faucet to make sure it is in good condition and that it operates properly.
With proper preparation and a few simple tools, it is possible to repair a leaking compression faucet. Testing and finishing up the repair is the final step in the process and helps ensure the faucet is working correctly. After the faucet is tested and any mess is cleaned up, the faucet should be inspected to make sure it is in good condition and operating properly.
Preventing Future Leaks
Preventing future leaks is key to avoiding the same problem in the future. As with many plumbing repairs, the best defense is maintenance. If you have a compression faucet, there are a few easy steps you can take to keep it in working order.
To start, make sure the packing nut is tight and the washer is in good condition. Replace any worn washers with new ones, and check the nut regularly for any signs of wear or tear. Additionally, inspect the valve seat for any chips or cracks, and ensure that it is properly lubricated.
You can also take a few preventative steps outside of the faucet itself. If your water pressure is too high, it can put extra stress on the faucet and cause it to fail prematurely. Installing a water pressure regulator can help maintain a balanced pressure, and ensure your faucet lasts longer.
Finally, be sure to clean your faucet regularly. Remove any debris, dirt, or grime from the inside of the valve, and ensure that the handle is free from obstructions. With proper maintenance and care, your faucet will be less likely to fail and cause a leak in the future.
FAQs About the How Do You Fix A Leaking Compression Faucet?
Q1. What tools are needed to fix a leaking compression faucet?
A1. You will need a wrench, adjustable pliers, a screwdriver, and an adjustable spanner to fix a leaking compression faucet.
Q2. What causes a compression faucet to leak?
A2. A compression faucet can leak due to a worn out gasket or washer, or if the valve seat is corroded or worn down.
Q3. How do I know if the faucet needs to be replaced?
A3. If the valve seat and gasket are severely corroded or the handle is difficult to turn, it may be time to replace the faucet.
Conclusion
Fixing a leaking compression faucet can be a relatively simple task that requires a few common household tools. The steps involve shutting off the water supply, disassembling the faucet, replacing the worn seals/washers, and reassembling the faucet. With a bit of patience and some basic plumbing knowledge, it is possible to fix a leaking compression faucet yourself. If you are still unsure, it is recommended to reach out to a professional for assistance.