How Do You Attach The Drain To A Kitchen Sink?
Installing a drain in a kitchen sink is a fairly simple process that can be completed in a short amount of time. The first step is to remove the sink from the counter and place it upside down on a flat surface. The next step is to attach the drain to the sink by inserting the tailpiece into the drain hole. Once the tailpiece is inserted, the strainer and basket should be securely tightened to the sink. Finally, the drain should be connected to the plumbing pipes, which should also be securely tightened. With the drain securely attached, the sink can then be placed back onto the counter and the job is complete.
Gathering the Materials
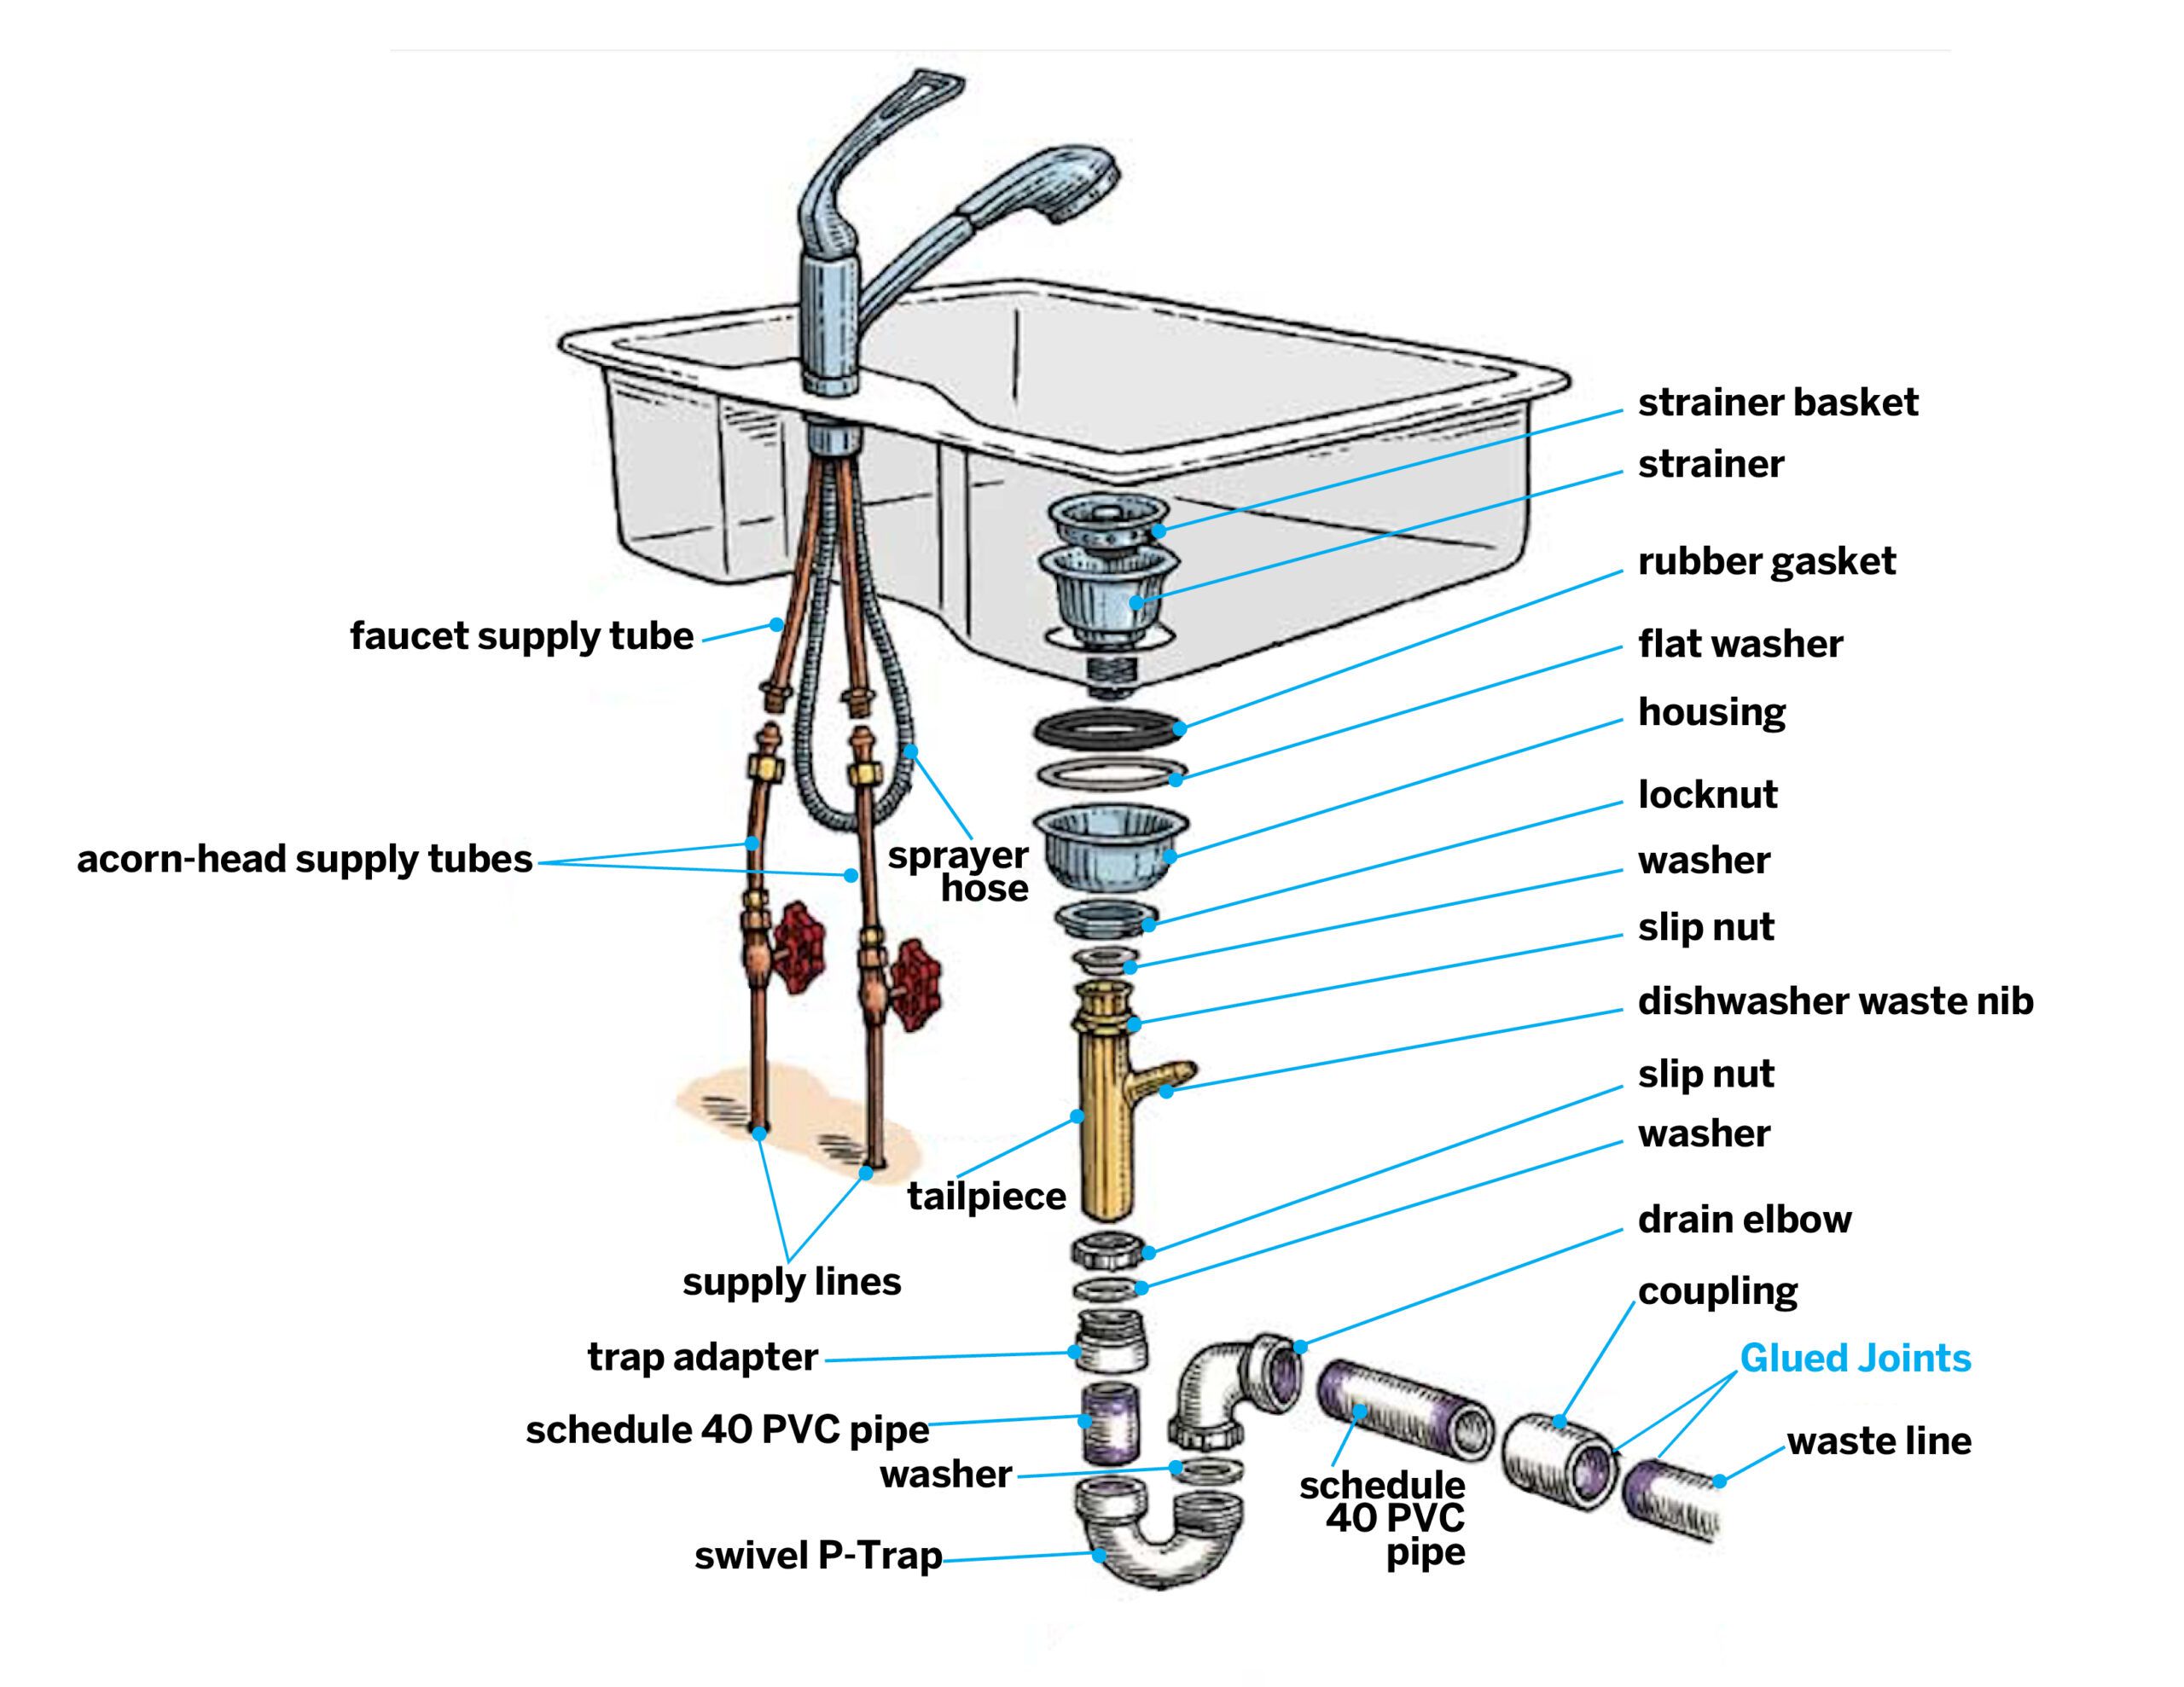
Installing a new kitchen sink is a task that can be daunting, but with the right materials and knowledge, you can easily attach the drain to your kitchen sink. Gather the materials you will need for the job including a wrench, plumber’s putty, a bucket, and the drain assembly. The drain assembly usually comes with a drain, a strainer, a tailpiece, a slip nut, a washer, and a gasket. Ensure that you have the right size drain assembly to fit the sink and that you have the correct tools for the job. All of these materials are essential for attaching the drain to the sink.
Removing the Old Drain
Removing the old drain from your kitchen sink can be a daunting task. However, with the right tools and some patience, you can easily replace your sink drain and have it running like new in no time. First, you must locate the drain stopper, which is the mechanism that closes the drain. Using a wrench or pliers, you can loosen the mounting nut and remove the drain stopper. Next, you must remove the old drain and the P-trap, which is the curved pipe that connects the drain to the wall. To do this, you must loosen the mounting nuts and unscrew the P-trap, then remove it from the wall. Finally, you must unscrew the mounting nuts and remove the old drain. With the old drain removed, you can now attach the new drain and get your sink running like new.
Preparing the New Drain
Installing a new drain in your kitchen sink can be a daunting task, but it doesn’t have to be. With the right tools, some elbow grease, and a few helpful tips, you’ll be able to attach your new drain quickly and efficiently. The first step is to prepare the new drain.
Begin by inspecting the new drain for any defects that might make installation more difficult. Make sure all of the necessary parts are included, such as the rubber gasket, tailpiece, and strainer. Once you’ve finished inspecting the drain, you’ll need to assemble it. Start by attaching the rubber gasket and tailpiece to the bottom of the sink. Then, place the strainer in the drain and tighten the nut underneath the sink to secure it in place.
Finally, you’ll need to attach the drainpipe to the tailpiece. Place the drainpipe over the tailpiece and tighten the nut to secure it in place. You’ll want to make sure there are no leaks, so be sure to check for any gaps or loose connections. Once everything is secure, you’re ready to finish the installation. With these simple steps, you can have your new drain attached in no time.
Installing the Drain to a Kitchen Sink
Installing a drain in a kitchen sink is a straightforward process. To begin, you will need a basin wrench, a plumber’s putty, a tailpiece, and a basket strainer. Once you have these supplies, you can start the installation process. First, turn off the water supply to the sink and disconnect the hot and cold water lines. Then, loosen the nuts that secure the tailpiece and basket strainer to the sink. Use the basin wrench to do this. Next, apply a generous amount of plumber’s putty to the underside of the tailpiece and place it into the sink. Then, insert the basket strainer and secure it with the nuts. Be sure to tighten the nuts securely, but not too tightly. Finally, attach the water supply lines to the faucet and turn the water back on. Follow these steps to easily install the drain in your kitchen sink.

Securing the Drain to a Kitchen Sink
A kitchen sink is a must-have in any kitchen, and as such, it is important to ensure that the drain is installed properly. Attaching the drain to the kitchen sink requires a few simple steps that, when followed correctly, can ensure a secure, water-tight seal and keep your kitchen sink functioning properly. Before proceeding with the installation, make sure that all parts are present and in working order.
To begin, begin by applying a bead of plumber’s putty along the underside lip of the sink’s drain opening, forming a ring. This will ensure a water-tight seal. Place the drain on top of the putty and insert the tailpiece of the drain into the sink’s drain opening. Use a rubber gasket and metal washer to secure the drain to the sink. Place the gasket on the tailpiece, followed by the washer. Tighten the drain by securely fastening the mounting nut to the sink’s drain opening. For extra stability, use locking pliers to secure the nut in place.
Once the drain is securely attached, attach the drain stopper. This will prevent water from going down the drain and is typically attached to the drain pipe or to the tailpiece. Finally, check the seal to make sure that there are no leaks. With these simple steps, you can easily attach a drain to your kitchen sink and ensure that your kitchen is both functional and stylish.
Testing the Drain
When it comes to attaching a drain to a kitchen sink, testing the drain is an important step. Before attaching the drain, it’s essential to test it for leaks. This can be done by filling the sink with water and checking for any leaks or slow drainage. If the sink is clogged, it’s best to use a plunger or snake to unclog it before attaching the drain.
Once the sink is filled with water, the drain can be attached. To do this, the tailpiece, the part of the drain that connects to the sink, must be connected to the sink’s drain opening. This is accomplished by using a gasket, which provides a watertight seal. The tailpiece should be inserted into the drain opening and then secured with a slip nut and washer. The slip nut should be tightened until the gasket is firmly secured.
Once the drain is connected, it’s time to test the seal. To do this, fill the sink and check for any leaking around the gasket. If the seal is solid, the drain is ready to be used. If there are any leaks, the nut should be tightened until the leak is sealed.
Troubleshooting Common Issues
Installing a kitchen sink isn’t a complicated process, but it can be intimidating for those unfamiliar with the process. One of the most common questions when it comes to kitchen sink installation is how to attach the drain. With the right tools and a bit of knowledge, you can have your kitchen sink up and running in no time.
The first step in attaching the drain to a kitchen sink is to make sure everything is lined up correctly. Start by fitting the drain strainer into the sink opening. Make sure the strainer is properly centered and the mounting holes are lined up with the holes in the sink. Then, place the rubber gasket onto the drain strainer and secure it with the mounting screws.
Next, attach the plastic J-bend to the underside of the sink. Place the J-bend over the sink’s drain opening, and secure it with the appropriate screws. Once the J-bend is in place, attach the metal tailpiece to the top of the J-bend. Secure the tailpiece with a nut, and use the plumber’s putty to create a seal between the tailpiece and the sink.
Maintaining the Drain in Your Kitchen Sink
Proper maintenance of your kitchen sink drain is essential for ensuring the longevity and efficiency of your kitchen plumbing. Not only can a clogged kitchen sink drain cause your sink to back up and overflow, but it can also lead to expensive repairs. To ensure that your kitchen sink drain is properly attached and maintained, there are a few key steps you can take.
First, you’ll need to identify the type of drain you have. Depending on the type of sink you have, you may need to use a different type of drain. For example, if you have a drop-in sink, you’ll need to use a drop-in drain. Similarly, if you have an undermount sink, you’ll need to use an undermount drain.
Once you’ve identified the type of drain you need, you can begin the installation process. You’ll need to carefully measure and mark the sink’s drain hole before cutting and drilling the necessary holes. Then, you’ll need to attach the drain to the sink, making sure to use the appropriate sealant or adhesive. Finally, you’ll need to attach the drain trap and the tailpiece to the sink to complete the installation.
FAQs About the How Do You Attach The Drain To A Kitchen Sink?
1. What type of sealant should I use to attach the drain to my kitchen sink?
Answer: Depending on the specific materials used in your kitchen sink and drain, you will likely need a plumber’s putty, silicone caulk, or some other form of sealant. Be sure to use the recommended sealant for your particular sink and drain materials.
2. How do I secure the drain to the sink?
Answer: After applying the appropriate sealant, position the drain in the sink and secure it with a nut and washer on the underside of the sink. Make sure the nut and washer are tight to prevent any leaks.
3. What tools will I need to attach the drain to the sink?
Answer: You will need a screwdriver, adjustable wrench, putty knife, silicone caulk (if necessary), and plumber’s putty (if necessary). You may also need a wire brush and/or a hacksaw depending on the specific materials used for your sink and drain.
Conclusion
After attaching the drain, the kitchen sink is ready for use. The process of attaching the drain is relatively simple and can be completed with the proper tools and instructions. You will need a plumber’s putty, a drain basket, a tailpiece, a slip nut, and a drain gasket. Once all the pieces are in place, the drain can be secured to the sink, ensuring the sink is properly installed and ready to use.